punk.AnimatedTilemap
An extended Tilemap class that allows defining animated tiles in Flash- and HaxePunk.
I really needed animated tilemaps in my project so I wrote this quick addon to make it as easy as possible. It mostly works with an array that store the different tile animations (with frames, framerate, timer and such) and the setTile() function.
The end result looks something like this:
!( )
)
Features
- Animated Tilemaps!
- As many animations as you like
- Each animation can have different amounts of frames and different framerates
- ???
How to install
You can find everything your need here on GitHub: https://github.com/voec/punk.AnimatedTilemap
Basicly just copy over either the HaxePunk or FlashPunk version of AnimatedTilemap to your game and you’re ready to go! (You can also copy it into your *Punk directory)
How to use
Using AnimatedTilemap is really easy, it works much like the Spritemap class. But I have written a small guide anyway to make it a bit simpler:
I.
So first of all you are going to need a tileset graphic. Let’s use this one:
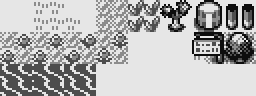
Each tile is 32x32 pixels. As you can see, there are 2 animation in there: One in the second row for the flowers bobbing around and one in the bottom row for the water animation.
II.
Draw a level with this tileset in your level editor of choice (I use Ogmo) like you would with a normal tileset.
When you want to draw some animated flowers or water in your level, make sure to draw them using the first frame of their animation in the tileset (so use the first tile from the left in this case). This is going to be important later.
III.
Now to create the tilemap in your game, instead of adding a normal Tilemap, make an AnimatedTilemap:
var tilemap:AnimatedTilemap = new AnimatedTilemap(YOUR_TILESET, 256, 96, 32, 32);

addGraphic(tilemap);
(For a tutorial on how to use Tilemaps or how to import Ogmo levels in *Punk have a look at www.youtu.be/TPPzgB3fv8A)
IV.
Now this should already work like a normal Tilemap. To add animations just do this:
tilemap.animate([8, 9, 10, 11], 1);
This syntax is really similar to Spritemaps, where the first parameter is an Array of frames that you want as your animation and the second parameter is the framerate at which to play the animation.
The frame index also works just like it does with Spritemaps, basicly you imagine every tile in your tileset as a frame in a Spritemap.
So if you wanted to also add the water animation, you see the tile is at the 16th position in the tileset and has 3 frames:
tilemap.animate([16, 17, 18], 1);
You can add as many animations as you want! (But you should probably not overdo it…)
V.
And that’s it already!
The animations will start automatically when the AnimatedTilemap is added and will loop on their own. Pretty easy.
My code is horrible and I’m a horrible person
If you have any suggestions on how to improve this, for example performance-wise, please let me know or create a pull request or something. I searched very long for a method to do this and just wanted to share it with anyone that could use it, but I am certain there is lots of room for improvement.
If you have any questions how to use the class or maybe ideas for new features please let me know as well!